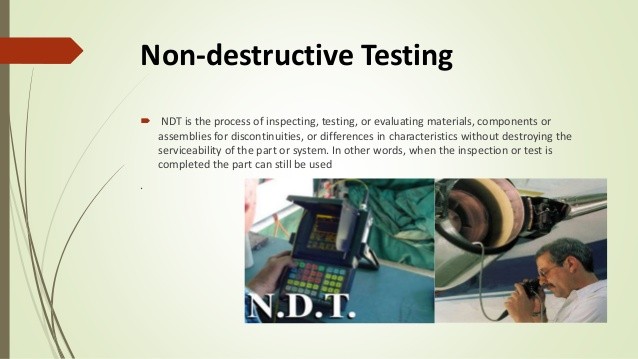
Non-destructive testing (NDT) is a way to detect and evaluate flaws in materials. The simplest and most accurate way of testing materials and components is often to test them to destruction. Destructive testing is used in aerospace to determine the physical properties of materials, components and assemblies. It can reveal useful information about characteristics of materials including ductility, tensile strength and fracture toughness. However, destructive testing is not always possible or desirable when testing parts and materials destined for, or already in use on, aircraft mainly because of their high value.
Nondestructive testing (NDT) is a wide group of analysis techniques used in science and technology industry to evaluate the properties of a material, component or system without causing damage. The terms nondestructive examination (NDE), nondestructive inspection (NDI), and nondestructive evaluation (NDE) are also commonly used to describe this technology. Because NDT does not permanently alter the article being inspected, it is a highly valuable technique that can save both money and time in product evaluation, troubleshooting, and research.
There is wide variety of nondestructive techniques or methods. These methods can be performed on metals, plastics, ceramics, composites, cermets, and coatings in order to identify cracks, internal voids, surface cavities, delamination, incomplete defective welds and any type of flaw which would lead to premature failure
NDT is also valuable for Military to detect defects that include cracks, corrosion, inclusions, and water intrusion. These systems are used to inspect various components of helicopters, control rod ends, aircraft propeller blades, and aircraft engine turbine blades.
NDT is commonly used in forensic engineering, mechanical engineering, petroleum engineering, electrical engineering, civil engineering, systems engineering, aeronautical engineering, medicine, and art. The six most frequently used NDT methods are eddy-current, magnetic-particle, liquid penetrant, radiographic, ultrasonic, and visual testing. In many cases, the approach to finding a defect requires more than use of a single NDT test method. It may require a combination of methods and also exploratory, invasive openings.
Within aerospace NDT plays a vital role in the design, manufacture and maintenance of aircraft. Safety is the single most critical aspect of aviation. NDT is used throughout a product’s lifecycle – from the qualification of new materials and the designing of new aircraft to in-service inspections of aircraft structures and engines.
A wide variety of non destructive testing methods plays most important roles in testing of composite materials. The applications of composite NDT may include in many places such as in manufacturing, pipe and tube manufacturing, storage tanks, aerospace, military and defence, nuclear industry, and composite defects characterization. Damage in composite materials can arise during material processing, fabrication of the component or in-service activities among which cracks, porosity and delamination are the most common defects.
NDT methods
Visual inspections are the oldest and simplest method of non-destructive testing. Visual inspection is particularly effective for detecting macroscopic flaws, such as poor welds. Many welding defects are macroscopic such as crater cracking, undercutting, slag inclusion, incomplete penetration welds, and the like. Likewise, VI is also suitably used for detecting flaws in composite structures and piping of all types. Visual inspections of aircraft structures and components for damage such as cracks, corrosion and misalignment will often be the first sign of a problem. Various equipment is used for visual inspections, from magnifying glasses and mirrors to video borescopes for viewing hard to reach places, charge-coupled devices and remote viewing systems.
Liquid penetrant testing is another simple and quick method widely used in aviation to detect surface defects and structural damage in non-porous materials. Test objects are coated with a highly viscous dye. Once the dye has settled into any cracks or flaws, the object is cleaned, leaving just the dye which has penetrated the cracks. Some of this remaining dye will flow back out, revealing an indication of the cracks and flaws.
Materials that are commonly inspected using DPT or LPI include metals (aluminium, steel, titanium, copper, etc.), glass, many ceramic materials, rubber, plastics.
Fluorescent penetrants are often used for sensitive materials and parts. Liquid penetrant testing is a flexible technique and can be carried out in-situ or in a workshop or hangar. It is also often part of cleaning and servicing parts, where the surfaces of objects are inspected after cleaning.
Acoustic emission testing is the application of an abrupt force to the test object, a ‘tap test’ and the analysis of the results. This analysis could be as simple as listening to the sound or using multiple sensors to record the resulting stress waves and small deformations that occur.
Leak testing uses four main techniques: bubble, pressure change, halogen diode and mass spectrometer testing, and involves pressurizing and immersing the test object in liquid to trace and record leaks. Aircraft and engines use large amounts of liquids and gas – leak testing is therefore an important part of manufacturing and maintenance.
Ultrasonic testing is the most common sub-surface technique and uses high-frequency sound waves to locate defects within a component or material. It is commonly used to detect defects in welds, fittings, joints, bolts and adhesive bond quality. The technique is similar to sonar, in that it records and analyzes the reflection of sound waves.
There are several different ultrasonic testing techniques used by aerospace engineers and technicians, including straight beam inspection, immersion testing and phased array inspections. All use an ultrasonic transducer, also called a probe, to send and receive soundwaves and display results as a graph on a screen.
Radiography- Radiography technique has a benefit or advantages over some of the other NDT methods in that the radiography provides a permanent reference for the internal soundness of the object that is radiographed. The x-ray emitted from a source has an ability to penetrate metals as a function of the accelerating voltage in the x-ray emitting tube. If any defect or irregularities such as void present in the object are radiographed, more x-rays will pass in that area and the film under the part in turn will have more exposure or spot light than in the non-void areas .
Radiography in aerospace can use both x-rays for thin materials and gamma rays for thicker materials. Traditionally film has been used to capture the image, but is being superseded by digital methods. A further recent advance is 3D computed tomography (CT) scanning, which captures multiple x-rays of a test object to build up a cross-section view of the object on a computer.
Magnetic particle testing involves inducing a magnetic field in the test object, applying magnetic particles to it either in dry form or suspended in a liquid, which could be colored or fluorescent, and then examining the object using suitable lighting.
The technique is used to detect discontinuities in ferromagnetic materials. Several different pieces of equipment can be used for magnetic particle testing depending on the environment, including yokes, prods, coils and heads.
Eddy-current testing is a sub-surface technique that induces an electromagnetic field in a conductive test object and measures the secondary magnetic field generated around the electric current to determine where flaws are. Eddy current testing is widely used in aircraft maintenance to detect cracks caused by fatigue or corrosion.
Vibration analysis monitors the vibration signatures generated by a rotating piece of machinery and interprets them to detect when something out of the ordinary occurs. Displacement sensors, which use eddy currents, velocity sensors or accelerometers attached to the machinery, can be used for the monitoring.
Thermal/Infrared testing involves mapping the surface temperatures of an object and can be used to detect damage such as corrosion, delamination, voids and disbonds. It works by detecting anomalies in the heat flow in a material or component.
Laser testing includes techniques such as shearography, holography and profilometry. All use laser light in different ways to detect deformation on the surface of objects and computer processing to compare stressed and unstressed conditions. It is most useful when detecting tiny flaws a few micrometers in size.
DARPA Unveils Gamma Ray Inspection Tech Project
The Defense Advanced Research Projects Agency plans to develop a tunable gamma ray technology to accommodate industrial, medical and national security usage. The agency intends to integrate tunable, high-intensity and narrow-bandwidth sources of gamma ray energy through a portable form factor device to help detect specific elements as part of the Gamma Ray Inspection Technology program, DARPA said Friday.
DARPA noted that the proposed system will stimulate the nucleus of an atom to cause a nuclear resonance fluorescence, an effect that will create a unique identifier to each isotope in the periodic table. “With GRIT, you could probe and detect specific isotopes of interest by fine-tuning the photon energy to minimize background noise and take advantage of the nuclear resonance fluorescence phenomenon,” said Mark Wrobel, a program manager at DARPA’s defense sciences office.
The Gamma Ray Inspection Technology (GRIT) program seeks transformational approaches to achieving high-intensity, tunable, and narrow-bandwidth gamma ray production, but in a compact form factor suitable for transporting the source to where the capability is needed. Such sources have the potential to help discover smuggled nuclear materials in cargo, provide new non-destructive inspection techniques at various scales, and enable new medical diagnostics and therapies.
Phoenix to demo neutron-based testing equipment to US Army
Phoenix has received a contract from the US Army to demonstrate neutron-based methods of non-destructive testing using its high flux neutron generators. The contract provides funding of approximately $4m to enable Phoenix to showcase a high-throughput, high-resolution thermal neutron imaging system and a fast neutron imaging system.
In addition, funding will support the company’s effort to fuse neutron radiographs with X-rays to present inspectors with ‘complementary’ information in the form of a hybrid image. Phoenix president Evan Sengbusch said: “With N-ray and X-ray capabilities merged, the technology Phoenix is developing will be instrumental in the inspection of large, complex munitions for the military and vital to ensuring our warfighters continue to receive safe and effective munitions produced in the most efficient manner.”
Phoenix believes this model will help reduce non-destructive inspection cycle times and improve the accessibility of neutron radiography. The army awarded a contract to the company in 2014 to design and build an accelerator-based neutron generator for use in non-destructive inspection of critical defence components such as munitions and pyrotechnics.
Phoenix won two additional contracts in 2016 to design and build a second-generation neutron generator for the army to enable the detection of defective munitions. The contracts also included performing standoff buried IED detection using a mobile neutron generator prototype developed by Phoenix.
System monitors radiation damage to materials in real-time
In order to evaluate a material’s ability to withstand the high-radiation environment inside a nuclear reactor, researchers have traditionally used a method known as “cook and look,” meaning the material is exposed to high radiation and then removed for a physical examination. But that process is so slow it inhibits the development of new materials for future reactors.
Now, researchers at MIT and Sandia National Laboratories have developed, tested, and made available a new system that can monitor radiation-induced changes continuously, providing more useful data much faster than traditional methods. With many nuclear plants nearing the end of their operational lifetimes under current regulations, knowing the condition of materials inside them can be critical to understanding whether their operation can be safely extended, and if so by how much.
The new laser-based system can be used to observe changes to the physical properties of the materials, such as their elasticity and thermal diffusivity, without destroying or altering them, the researchers say. The findings are described in the journal Nuclear Instruments and Methods in Physics Research Section B in a paper by MIT doctoral student Cody A. Dennett, professor of nuclear science and engineering Michael P. Short, and technologist Daniel L. Buller and scientist Khalid Hattar from Sandia.
The new system, based on a technology called transient grating spectroscopy, uses laser beams to probe minute changes at a material’s surface that can reveal details about changes in the structure of the material’s interior. Two years ago, Dennett and Short adapted the approach to monitor radiation effects. Now, after extensive testing, the system is ready for use by researchers exploring the development of new materials for next-generation reactors, or those looking to extend the lives of existing reactors through a better understanding how materials degrade over time under the harsh radiation environment inside reactor vessels.
The old way of testing materials for their response to radiation was to expose the material for some amount of time, then take it out and “bash it to pieces to see what happened,” Dennett explains. Instead, “we wanted to see if you could detect what’s happening to the material during the process, and infer how the microstructure is changing.”
The transient grating spectroscopy method had already been developed by others, but it had not been used to look for the effects of radiation damage, such as changes in the material’s ability to conduct heat and respond to stresses without cracking. Adapting the technique to the unique and harsh environments of radiation required years of development.
To simulate the effects of neutron bombardment — the type of radiation that causes most of the material degradation in a reactor environment — researchers commonly use ion beams, which produce a similar kind of damage but are much easier to control and safer to work with. The team used a 6-megavolt ion accelerator facility at Sandia as the basis for the new system. These types of facilities accelerate testing because they can simulate years of operational neutron exposure in just a few hours.
By using the real-time monitoring ability of this system, Dennett says, it’s possible to pinpoint the time when the physical changes to the material start to accelerate, which tends to happen fairly suddenly and progress rapidly. By stopping the experiment just at that point, it’s then possible to study in detail what happens at this critical moment. “This allows us to target what the mechanistic reasons behind these structural changes are,” he says.
Short says the system could perform detailed studies of the performance of a given material in a matter of hours, whereas it might otherwise take months just to get through the first iteration of finding the point when degradation sets in. For a complete characterization, conventional methods “might be taking half a year, versus a day” using the new system, he says.
In their tests of the system, the team used two pure metals — nickel and tungsten — but the facility can be used to test all sorts of alloys as well as pure metals, and could also test many other kinds of materials, the researchers say. “One of the reasons we’re so excited here,” Dennett says, is that when they have described this method at scientific conferences, “everybody we’ve talked to says ‘can you try it on my material?’ Everybody has an idea of what will happen if they can test their own thing, and then they can move much faster in their research.”
The actual measurements made by the system, which stimulates vibrations in the material using a laser beam and then uses a second laser to observe those vibrations at the surface, directly probe the elastic stiffness and thermal properties of the material, Dennett explains. But that measurement can then be used to extrapolate other related characteristics, including defect and damage accumulation, he says. “It’s what they tell you about the underlying mechanisms” that’s most significant.
The unique facility, now in operation at Sandia, is also the subject of ongoing work by the team to further improve it capabilities, Dennett says. “It’s very improvable,” he says, adding that they hope to add more different diagnostic tools to probe more properties of materials during irradiation. The work is “a clever engineering approach that will allow researchers to characterize the response of a variety of materials to irradiation damage,” says Laurence J. Jacobs,
Professor and associate dean for academic affairs at the Georgia Tech, who was not involved in the study. He says it is “an outstanding piece of research on a noncontact, nondestructive evaluation technique that enables the real-time, in situ monitoring of the mechanical properties of a material subjected to ion beam irradiation.” The research was supported by the U.S. Department of Energy, the MIT-SUTD International Design Center, the U.S. Nuclear Regulatory Commission, and the Center for Integrated Nanotechnologies at Sandia National Laboratories.
NDT standards and training
There are several national and international organizations that develop standards for NDT methods, equipment and training. These include the American Society for Nondestructive Testing (ASNT), the British Institute of Non-Destructive Testing, the International Committee for Non-Destructive Testing and the European Federation for Non-Destructive Testing. International standards are also overseen by the ISO and the ASTM International (American Society for Testing and Materials).
Standard exists for both civil and military tests and training. Common certifications for staff using non-destructive testing include ASNT’s Central Certification Program (ACCP), while the SNT-TC-1A Personnel Qualification and Certification in Nondestructive Testing provides guidelines and a framework for in-house NDT certification programs. SNT TC-1A has three different levels of qualification, each with more duties and responsibilities than the last.
References and resources also include:
http://news.mit.edu/2018/system-monitors-radiation-damage-materials-1218
https://www.aerospacetestinginternational.com/features/introduction-to-non-destructive-testing.html
https://www.executivegov.com/2019/06/darpa-unveils-gamma-ray-inspection-tech-project/