 International Defense Security & Technology Your trusted Source for News, Research and Analysis
Related Articles

Every year there are huge trade shows where companies reveal all the latest new products in hopes to draw interest from distributors, dealers and prospective customers. There are Auto shows, Electronics shows and Agricultural shows just to name a few. Most manufacturing companies participate in one or more of the various product expos held around the globe. Companies are continually improving existing products or introducing the latest “all new” models.
A New Product Introduction (NPI) program encompasses all the activities within an organization to define, develop and launch a new or improved product. The product could be something tangible, as in the case of a new model automobile, or intangible as in a particular service offered. The acronyms NPI (New Product Introduction) and NPD (New Product Development) are used interchangeably by many organizations. The goal is to get one prototype to work first under ideal conditions.
Since NPI requires a substantial investment of time and resources, careful planning goes into each step to ensure that the result will be worth the effort. Manufacturers dedicate considerable cost and effort to New Product Introductions (NPI).
Findings from LNS Research reveal “the median manufacturer invests 25 percent of its personnel in NPI and introduces a new product in an average of 24 months. Even with this substantial investment NPI often fails to deliver expected outcomes. Only 56 percent of new products meet all NPI success criteria.” Common reasons for failure are a lack of product design and development.
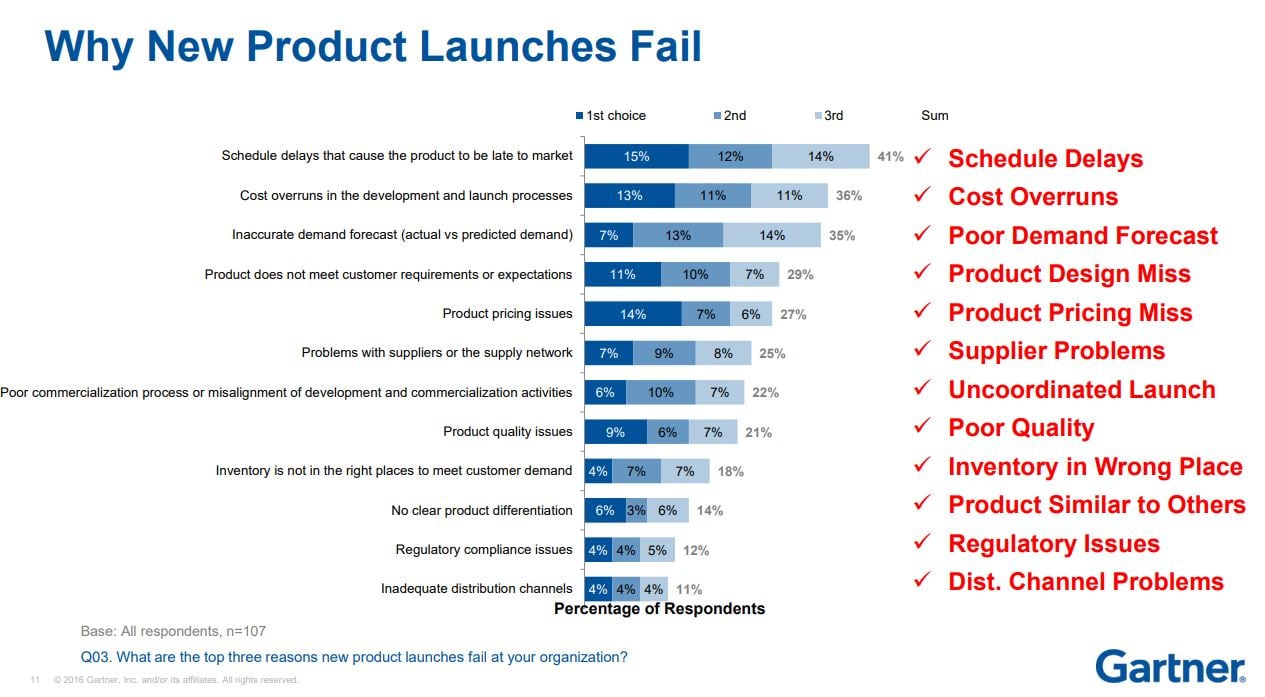
Survey conducted by Gartner in 2019 questioned CEOs about the success of new product introduction, and the numbers were sobering. The survey found that 45% of product launches are delayed by at least one month, and 20% of these do so because they fail to meet internal targets. The top reasons for new product introduction failure are schedule delays, cost overruns and poor demand forecast. Large projects like a product development project are combinations of imagination and skill, technical prowess and attention to detail across disciplines.
New Product Introduction (NPI) is the process that takes an idea from an initial working prototype to a thoroughly refined and reproducible final product. The Design stage focuses on the product, not the fabrication method. Engineers work together to draft concepts for the product until the feasibility of a design path presents itself as the best solution. The NPI process proceeds with iterations until there is a final working prototype.
Advantages of NPI process
Most successful organizations realize the importance of implementing an NPI process. In today’s highly competitive market, companies must develop the right product, at the right time and the right cost. Developing and following a robust NPI process can denote the difference between success and failure. Some of the many advantages of New Product Introduction include
- Reduced Development time and Cost: Product design starts with careful consideration of the product requirements in the early design phase to reduce delays and redesign costs. By incorporating the Voice of Customer (VOC) into the early stages of the project, the design team can avoid late design changes, multiple revisions and repeated costly validation testing. The most cost-effective way to reduce costs and increase productivity is to consider the manufacturing and assembly problems at the product design stage.
- Faster Time to Market: Today manufacturers are faced with a competitive landscape. They need to expedite their schedules in the product development cycle to be confident they can deliver their products faster to meet customer demand. With a reduction in development time, the product will reach the consumer and begin generating revenue sooner. This in turn leads to a quicker return on investment.
- More Efficient Manufacturing using (DFM/DFA/DFx): Through the effective use of Design for Manufacturing and Assembly (DFM/DFA) best practices, products are designed with the process in mind. Adopting Design for Excellence (DFx) upfront as an integral part of the product development process produces higher quality products, lower product cost, and shorter product development cycles. A DFx team engages with the customer early on to assist designing sources of potential issues out of the product.
- Improved Product Quality: The NPI process incorporates tools targeted at ensuring the product meets customer needs and the process is capable of producing quality products on a consistent basis. Manufacturers can differentiate a product in terms of quality before the actual production process. Introducing Design for Quality in the design process leads to better quality outcomes.
- Higher Customer Satisfaction: The NPI process helps meet customer needs more efficiently. In the design for manufacturability stage issues are addressed before they become sources of manufacturing defects. Improved product quality and reliability leads to greater customer satisfaction.
- Guided Technology Decisions: Analysis tools help evaluate and streamline design considerations. This helps reduce the number of design revisions and improve reliability.
- Better Market Adoption: Being able to focus on customer needs, expectations, and product improvement will lead to better market adoption.
- Streamline Supply Chain Management: A product can be developed from the beginning to be supply chain efficient. A robust product lifecycle management program that supports product in the design and development phases is imperative for product success. It should include obsolescence management that takes into account the lifespan of the components being used with a plan to replace parts as they reach the end of their life cycle or become scarce and allocated.
- Could be the Difference Between Success and Failure: Optimising products in the design phase before manufacturing make the difference between success and failure. Product design determines product cost, quality and development cycle. Product design determines 75% of product cost
Implement New Product Introduction (NPI) process
The NPI process can vary greatly from organization to organization. In some cases, NPI activities begin after design and development and merely deal with the product production launch and marketing. In some cases, it can actually vary within different divisions of the same company. For an NPI process to succeed it must have full active support of upper management in all divisions and departments. An effective NPI program involves a large amount of cross-functional communication and teamwork.
A New Product Introduction process can consist of various phases or gates. The phase gate system keeps management apprised of the project progress and assures all activities are completed on time. The example shown below consists of six phases:
- Define
- Feasibility
- Develop
- Validate
- Implement
- Evaluate
Each phase of the NPI process feed into the next. Many organizations look at the process as having a beginning (Define) and an end (Evaluate). Some variations combine Define and Feasibility into one phase and Develop and Validate into another. All too many companies leave the Evaluate phase out completely, thus losing valuable information for future projects. The fact is, the NPI process is not a straight line. Instead, it is an endless circle or loop. The hardest phase to complete for many organizations is the Evaluate phase. Once the product is on the market, we rush to the next one and then the next, failing to feed lessons learned into subsequent projects.
At each phase of an NPI project, there are inputs and outputs. In addition, there are various requirements, tools, documentation and processes within each phase. The following sections will cover each of the project phase requirements.
Define
During the Define Phase, the product’s functional / performance requirements are defined along with the VOC. The Marketing and Product Management divisions of an organization are usually the primary sources of this information. The product requirements are converted to design specifications, often using the Quality Function Deployment (QFD) process.
Quality function deployment (QFD) is a method to transform qualitative user demands into quantitative parameters, to deploy the functions forming quality, and to deploy methods for achieving the design quality into subsystems and component parts, and ultimately to specific elements of the manufacturing process. The design specifications are integrated into one or more concepts to be reviewed by the project team.
The management team should develop a Project Charter. The information contained in the charter should include, but is not limited to, the following: Background Information, Primary Objectives, Project Scope, Key Deliverables and Dates, Project Budget, Identify Stakeholders and Sponsor, Identify Project Manager and Define the Team, Review Possible Constraints / Assumptions / Concerns / Risks,
In addition to the design concepts and the project charter, an initial business case is developed during the define phase. The business case should identify the market or customer and the competition. Thorough Cost Benefit, Sensitivity, Risk and Contingency Analysis’ should be contained within the business case along with clear definitions of success and failure. The business case is reviewed at each phase of the project.
Feasibility
The purpose of the Feasibility Phase is to allow management an opportunity to evaluate the project’s potential for success. During the Feasibility Phase, the project team reviews the product design concepts and selects the design that best fulfills the previously defined requirements. The business case is reviewed and refined.
The outputs or deliverables of the Feasibility Phase should include (but are not limited to):
- Boundary Diagram: A graphic tool defining the scope of the project, along with internal and external interactions
- Preliminary Design Concept: Includes a high level Bill of Material (BOM)
- Process Flow Diagram: Outline the basic processes required for production
- During the gate review, the project team presents all applicable information regarding the selected design concept, proposed location and method of manufacture, including strengths and risks of the project, an updated business case and the current strengths and risks of the project. The output or result is a determination of whether the project and proposed product design should move forward to the next phase, be redesigned, or abandoned altogether.
Develop
The Develop Phase activities are focused on advancing the product design features and characteristics into a more defined form while assessing risk in the design. A validation plan is also developed during this phase. A comprehensive review of the design is performed to evaluate the robustness of the design and its ability to meet customer and performance requirements. DFM/A activities are initiated prior to design completion or design freeze. In addition, the process required for production is being evaluated, including location, space requirements, equipment and preliminary process mapping. Furthermore, other business units are being pulled into the project to address any operational concerns such as material forecasting, supplier selection and development, etc. Some of the common outputs of the Develop Phase are listed below:
- 3D Models of the Design
- Concept Level Drawings
- Bill of Materials (BOM)
- Design Failure Mode and Effects Analysis (DFMEA)
- Design Verification Plan and Report (DVP&R)
- DFM/A Reviews
- Manufacturing Preliminary Footprint
- Safety / Regulatory Audit Reports
- Preliminary Engineering Design Freeze
During the gate review, the project team presents updated information about the design, project timeline, risk assessments and an updated business plan or report of financial status. The management team will determine if the project should move to the next phase or refine the design or test plan further prior to proceeding.
Validate
During the Validate Phase, product analysis and testing are performed. Some testing cannot occur until prototype parts are available. Design changes are possible due to the results of validation testing but very costly. In addition, the manufacturing process is developing and process risk is being analyzed and addressed. The major steps of the manufacturing process are being developed and reviewed. Product analysis and the testing schedule are being developed and prototype parts completed. Some of the common outputs of the Validate Phase are listed below:
- Packaging Standards
- Production Level Drawings
- Design Validation Plan and Report (DVP&R)
- Process Flow / Process Mapping
- Process Failure Modes and Effects Analysis (PFMEA)
- Review Supplier Production Part Approval Process (PPAP) Submissions
- Prototype – Process Work Instructions
- Fixture / Tooling Creation and Build
- Prototype Builds
Upon completion of the activities conducted during Validate Phase, the team should review the project with the owner and stakeholders. The purpose of this gate review is to gain management approval to move the project forward to the next phase and keep lines of communication active.
Implement
During the Implement Phase of the NPI process the manufacturing processes are refined and validated through pilot builds and capability studies. In addition, process documentation and quality controls are being developed and implemented. Furthermore, various other activities are on-going including, but not limited to, the following examples:
- Development of Manuals
- Pricelist / Catalogue / Quote Tool
- Process Work Instructions and Standard Work
- Approval of Supplier PPAP Submissions Internal Training of Associates
- External Training of Sales, Dealers, etc.
- Production Control Plans
- Significant Production Run / Pilot Build
- Process Capability Studies / Statistical Process Control (SPC)
- Packaging Evaluations
- Final Safety / Regulatory Review
Evaluate
The Evaluate Phase timing can vary depending upon the organization, the product being produced or the service provided. It is generally initiated 30 to 60 days following production launch. The Evaluate Phase serves several purposes in the product introduction process. This phase provides the team an opportunity to tie up any remaining documentation tasks, review process performance and collect customer feedback on the new product.
The team should also take this opportunity to review any lessons learned and document them for use in future projects. One tool that has proven effective for some organizations is the TGR/TGW exercise. TGR/TGW stands for “Things Gone Right / Things Gone Wrong”. During this exercise the team gathers to take an objective look at the project. Discussion revolves around all the things that went well and the things that may not have gone well or could have been improved. The causes of the TGWs are examined and countermeasures developed to prevent re-occurrence in the next project. The TGRs should be carried over to future projects as a continuous improvement effort within the NPI process. The integration of lessons learned into future projects essentially closes the loop in NPI, helping to retain valuable information and develop a more robust and progressive NPI process.
Best NPI practices
Among the best practices Gartner suggests is the use of a Project Manager (PM) to coordinate the NPI activities. Surprisingly, 36 percent of the survey respondents don’t use a project manager and, “fewer than 20% of organizations see their product managers as driving innovation or improving collaboration within the company.” This survey revealed that product managers who prioritize their responsibility of improving internal collaboration are more likely to experience successful product launches.
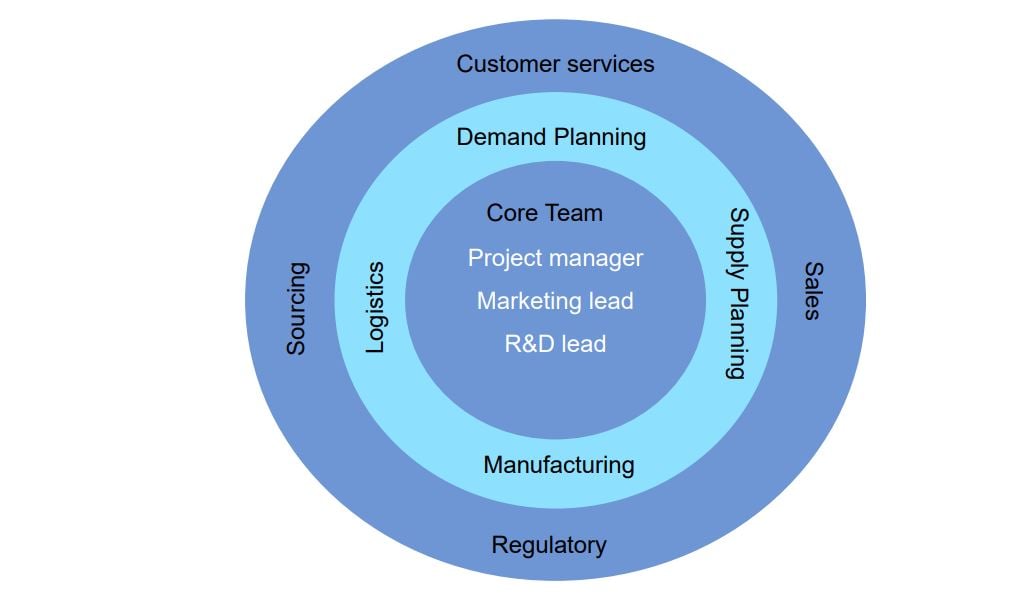
Gartner also suggests companies use a cross-functional NPI team throughout the product launch. Here’s a graphic they used to illustrate the concept. The Core Team, made up of the Project Manager, Marketing Lead and R&D Lead, are surrounded by the project principals from sourcing, logistics, customer service, manufacturing sales and other divisions as needed. Gartner research director Janet Suleski described this cross-functional team as “dynamic,” with different principals joining the Project Manager (in the center) as needed during the life of the project.
NPI Checklist?
It’s a good idea to build your checklist with input from members of the cross-functional NPI team. Each division will be able to offer suggestions about what should be included based on answers they’ll need to get during the process. Here are a few other items that will help organize your checklist:
- List the criteria in the order they need to be accomplished.
- Make your list generic, able to be used regardless of material or manufacturing process.
- If a field isn’t required, mark N/A.
- Leave room next to each item for notes or comments.
List your project by name and any account or project number you’ve assigned to it.
Describe the part and include any internal identifying number you’ve given the project.
List the project initiation date and the estimated annual usage (EAU) of the project.
List the names and responsibilities of the project principals, for example:
- Project Engineer
- Supplier
- Sales Account Manager
- Customer Service Representative
- Customer Contact (technical)
- Customer Contact (purchasing)
- Project Coordinator
- Project Manager
Project Objective – Describe your project. What is it? Why is your company doing it? What is the business case?
Project Scope – Offer a high-level explanation of the project scope. How involved is it? Describe the manufacturing process you’re using, whether or not tooling is needed, critical parts, mating parts and cosmetic requirements.
Sampling requirements – State the number of PPAP samples, number of T1 samples and other details around the samples, i.e. where they will be shipped and who will bear the shipping costs.
Customer testing requirements – List specific testing requirements including conflict minerals and third party certifications, as well as the testing schedule and costs.
Supply Chain – You might want to have a place on your checklist to list any components in your product that have the capability to throw a wrench into production because of supply chain issues. For example, the electronics components shortage is creating long lead times that is affecting production times. A single component can delay an entire project. This section on your checklist would make it easy to track.
Schedule – You will want to keep track of key dates such as:
- Sampling – ETA date
- First Production – ETA date
- Project Milestones, including Project Initiation, Drawing Release Date, Tooling Fabrication Completion, Sampling Shipment Date, PPAP Sample Approval, First Production, etc.
PPAP Checklist – Include your PPAP checklist (noting Level I,II,III requirements) as part of your NPI checklist.
Tips for Salvaging a Troubled Project
Sometimes, despite the best of intentions and checklists, things can still go south. What do you do? How can you save a project that’s headed for the rocks? Gartner researcher Matt Light developed a 10-step process for rescuing projects endangered by cost overruns, delays, resources that have dried up and other perils.
1. Press the brakes: This can be a full stop or gentle tap, but the point is, the project needs to slow down so the team leadership can get a better look at what’s going on.
2. Make time to talk: Everyone involved in the project needs to be at the table and everyone should have (as they say in the movies) “permission to speak freely.” It’s only with open and honest dialog of what’s going on that you will get to the bottom of the problems and begin to find the solution.
3. Draw a line in the sand: Boundaries are our friend. Sometimes a project can’t be rescued and it’s good to know that. But you can’t know that until you know when it’s too far. Know when to stop trying by drawing that line.
4. Understand the root cause: The best way to get to the root cause, or ‘why’ is to ask detailed questions which generally net detailed answer. A recommended technique is the “five whys.” Here’s an example:
- First why: The battery is dead.
- Second why: The alternator is not functioning.
- Third why: The alternator belt has broken.
- Fourth why: The alternator belt was well beyond its useful service life and not replaced.
- Fifth why: The vehicle was not maintained according to the recommended service schedule (root cause).
5. Recognize the risks: The fact that this project is already in rescue mode makes it riskier than usual. New risks may arise as you proceed. Stay aware of these new risks especially in these key areas: complexity, technology, operations, external, organizational, schedule and financial.
6. Prepare to fight for the project: If you’re going to make this work you might have to do battle with stakeholders and decision makers to create a plan of action. Items you’ll need for the meeting include:
- Preparing materials and gathering information (current reports, statistics) to facilitate discussion.
- Soliciting input from stakeholders attending the meeting.
- Creating an agenda in advance of the meeting.
7. Meeting with stakeholders: Gartner’s Light suggests that all stakeholders and decision makers meet in one room, ideally face to face, to work through different scenarios and agree on next steps. The key questions to consider are:
- Is the business case sill valid if we take into account the rescue costs?
- If not, is there a new business case that justifies the rescue?
As painful as it may be, killing the project should always be an option on the table.
8. Decide the next step(s): Whatever decisions are made, it’s important to move on them quickly. For the sake of the project and to maintain momentum, move on the next steps within 24 to 48 hours of the meeting with stakeholders.
9. Confirm the plan: Make sure everyone understands who is responsible for what and whether resources are still available or need to be replaced.
10. Hit the reset button: You’ve started over. There’s a new plan, parameters, scope, goal. There’s no need to live in the past. You’ve gone through the ‘lesson’s learned’ phase, so affirm your goals and move on.
Whether it’s putting together a chair from IKEA or starting a new product line, having the right tools for the job makes all the difference in the world. The right checklist, process or mindset can put your product development project on the road to success.
References and Resources also include:
https://news.ewmfg.com/blog/npi-transition-checklist-items-to-include